Bike gears skipping or not changing: causes and fixes
Why bike gears skip, ghost-shift or refuse to change: cable tension, indexing, bent hanger, worn cassette. How to tell which it is, and the two-minute fix.

Written by Conor DonoghueCargo bike mechanic
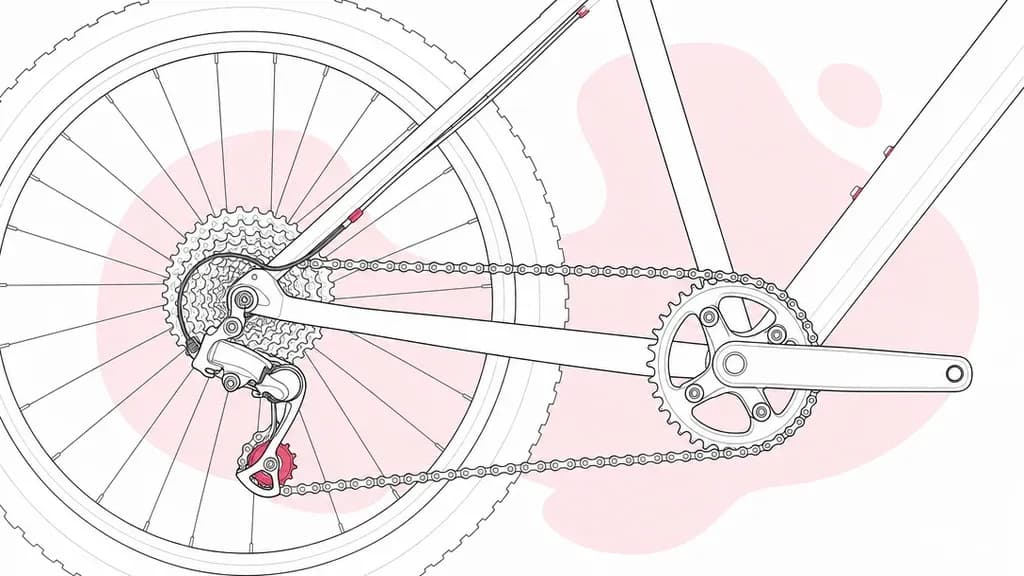
Short answer: start with cable tension, the quickest and fully reversible check. Find the barrel adjuster where the gear cable leaves the shifter or enters the rear derailleur. If the chain is slow to climb to bigger sprockets, turn it anticlockwise half a turn; if it is slow to drop to smaller ones, turn it clockwise. Repeat until each click gives one clean shift. A chain that slips under load in the same gear is worn rather than loose, and more tension makes it worse.
What is actually happening: skipping, ghost shifting or not shifting
These get lumped together, but they are three different faults, and naming yours correctly is half the diagnosis. Skipping is the chain jumping to a neighbouring sprocket, or slipping forward under load. Ghost shifting is the bike changing gear when you did not touch the shifter, because the derailleur is sitting between two indexed positions and hops over bumps. Not shifting is clicks at the lever with nothing, or a long delay, at the wheel.
As a rough map, skipping under load is usually wear, ghost shifting is usually indexing, and not shifting is usually the cable itself. Diagnose before you adjust, because the fix for one fault can make another worse. Adding cable tension to cure a worn-chain slip, for example, just moves the derailleur off line and adds ghost shifting on top.
The five usual causes, and how to check each one
1. Cable stretch
Gear cables settle into their outer casing and stretch slightly with use, most noticeably in a new bike's first few weeks. That is why brand-new bikes come back shifting badly for the free first check some shops offer a few weeks after purchase. The symptom is indexing that has drifted everywhere at once: hesitant climbs to easier gears and rattly running in the middle of the cassette. Check: if half a turn on the barrel adjuster makes everything crisper, this was the cause. The barrel adjuster exists precisely for this drift.
2. Indexing out of adjustment
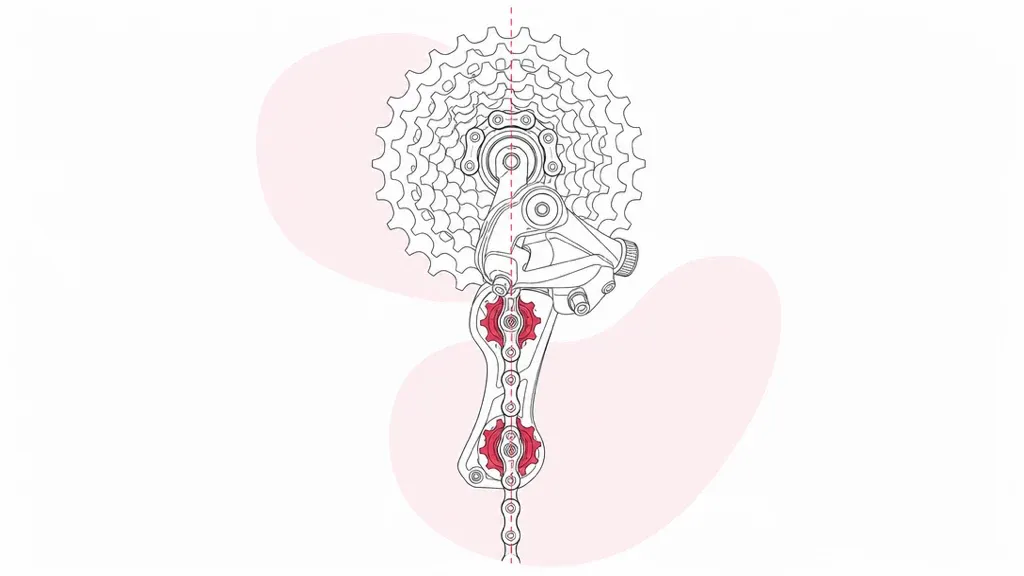
Indexing is the alignment between the shifter's click positions and the actual sprockets. When it is out, the derailleur stops between gears: shifts hesitate in one direction, ghost-shift in the other, and the drivetrain ticks in gears that used to run silently. Check: with the bike in a middle gear, look at the derailleur's upper jockey wheel from behind. It should sit exactly under the sprocket the chain is on. If it sits slightly to one side, the indexing is out, and the barrel-adjuster steps below are the fix.
3. Bent derailleur hanger
The hanger is a soft aluminium tab between the frame and the derailleur. It is soft on purpose, so that it bends instead of your frame. It bends in falls, in train luggage racks, and simply from leaning the bike drive-side against a wall. Check: sight from directly behind the bike. The two jockey wheels and the sprockets should line up in one vertical plane. A visible tilt, or shifting that is fine in the small sprockets and chaotic in the big ones, points at the hanger. A badly bent hanger can put the derailleur into the spokes on a downshift, which turns a cheap part into a destroyed wheel. If you suspect it, stop adjusting and get it aligned.
4. Worn chain and cassette
Chains lengthen as their pins and rollers wear (this is what "chain stretch" means), and a lengthened chain no longer meshes with the sprocket teeth. It rides up and slips forward under load, classically in the one or two gears you use most. Check: a chain-checker tool gives a yes or no in seconds. Replace an 11 or 12-speed chain when it reads 0.5 per cent, and a chain with 10 speeds or fewer at 0.75 per cent. The ruler method works too: on a new chain, twelve full links measure exactly twelve inches pin to pin, and anything past 12 1/16 inches (0.5 per cent) means the chain is due. Two things to know. A new chain on a worn cassette often still slips, because they wear as a pair, and no amount of adjustment fixes wear. This is a parts job rather than a tuning job.
5. Friction in the cable run
Dirt, water and corrosion inside the outer casing make the inner cable drag. The spring can no longer pull the derailleur back smoothly, so shifts lag in one direction and mysteriously improve when the bike is clean and dry. London winters, with their salt, grit and rain, are exactly what causes this, and internally routed cables hide it well. Check: click the shifter while watching the derailleur. A crisp click followed by lazy movement means friction. The real fix is a new inner and outer cable. Lubricating an old corroded run buys weeks rather than months.
If the gears have seized outright after a wet winter, start with the derailleur: a drop of light lube on its pivots, then push the mech through its travel by hand until it swings freely. If the inner wire is rusty or stiff in the outer, replace both rather than trying to free it. A shifter whose ratchet has seized inside is a workshop job.
Which one do you have?
| Symptom | Likely cause | DIY? |
|---|---|---|
| Hesitates on every shift, worse one way | Cable tension or early stretch | Yes, with the barrel adjuster (steps below) |
| Changes gear on its own over bumps | Indexing between positions | Yes, with the barrel adjuster |
| Fine in small sprockets, chaotic in the biggest | Bent hanger | No, it needs an alignment gauge |
| Slips forward under hard pedalling, same gear | Worn chain or cassette | Partly: a chain checker answers it in seconds |
| Lever clicks, wheel does nothing | Frayed or seized cable | Borderline, and fiddly on internal routing |
| Shifts lag one way, better when clean and dry | Friction in the cable run | Temporarily; new cables are the real fix |
| Chain falls off the ends of the cassette | Limit screws | Carefully, see the limit-screw section |
| Everything crunchy, chain dry or rusty | Neglected drivetrain | Yes: clean and lube first, then re-test |
The barrel-adjuster fix, step by step
1. Find the adjuster
A knurled barrel where the cable leaves the shifter, or where it enters the rear derailleur. Some bikes have one in-line on the cable run instead. No tools are needed, because it turns by hand.
2. Get the wheel turning
You need to pedal while shifting, so use a workstand, ask a friend to lift the saddle, or do short test rides up a quiet street between adjustments. Do not try to judge shifts while wheeling the bike by hand, because the chain needs to be moving under a little load.
3. Work in half turns
If the chain is slow to climb to bigger sprockets (easier gears), turn the adjuster anticlockwise half a turn. If it is slow to drop to smaller sprockets, turn it clockwise half a turn. Test the full range after every half turn. Stick to half turns, because it is easy to sail straight past the sweet spot and conclude that the adjuster does nothing. Half turns suit the 7 and 8-speed Shimano Tourney and Altus gears on many Carrera, Apollo and Decathlon commuters. On 11 and 12-speed road and gravel groups (Shimano 105 or GRX, SRAM Apex or Rival) the sprockets sit closer together, so work in quarter turns.
4. Stop at one click, one clean shift
Every click should move the chain exactly one sprocket, promptly, in both directions, and the drivetrain should run silently in each gear. Do a final check in the gears you actually commute in, under real pedalling load on the street.
5. If it never settles, the fault is elsewhere
If you keep winding without ever reaching "crisp", the problem is not tension. Go back to the hanger, chain-wear and cable-friction checks above, because more tension cannot fix any of those three.
Limit screws: what they do and when to touch them
The two small screws on the derailleur body, usually marked H and L, set the physical end stops of its travel. They stop the chain going past the smallest sprocket into the frame, or past the biggest into the spokes. One thing to know before touching them: limit screws do not drift. If your shifting got worse over weeks, the limits are not the cause, and turning them will add a new problem. Touch them only if the chain actually falls off the ends of the cassette or chainrings, and then in quarter turns, remembering which way you went. If the chain has been going into the spokes, check the hanger first, because a bent hanger changes where the limits point.
Front derailleur playing up instead?
Front shifting is cruder than rear shifting, and its two usual complaints have different answers. Chain rub in certain combinations, such as the biggest sprocket with the big ring or the smallest with the small ring, is cross-chaining. The chain is running at its most extreme angle, and every drivetrain rubs there, so this is a riding-habit fix rather than a mechanical one. The chain refusing to climb to the big ring is usually low cable tension, and the same barrel-adjuster logic applies: anticlockwise in half turns. If the chain drops off the rings to the inside or outside, that is the front limit screws, with the same warning as above: quarter turns, and only if it is actually dropping.
E-bikes and hub gears: two special cases
E-bikes with derailleurs follow everything above, with one big caveat. A mid-drive motor pushes through the same chain you do, so drivetrain wear arrives much sooner than riders expect. Check chain wear more often, and be gentler still about shifting under power. Bosch motors have shift detection that eases the power for a moment, and some Shimano Steps systems do the same, so give them that half second. Hub gears (Shimano Nexus and Alfine and similar, common on Dutch-style bikes and many e-city bikes) are a different system entirely. The gears live inside the rear hub, and adjustment means lining up two coloured marks at the hub or shifter rather than indexing a derailleur. If your bike has one gear cable disappearing into the rear hub and no derailleur, the derailleur steps above do not apply. The good news is that hub gears mostly need their cable tension set once and then leave you alone. A Brompton is the London special case: the 3-speed Sturmey-Archer hub is set with the shifter in second gear, so that the end of the indicator rod sits level with the end of the axle when you look through the window in the nut, and the 2-speed derailleur on 6-speed models has its own small adjuster. Stepless Enviolo hubs on Urban Arrow and other cargo bikes have no indexing at all and are set by lining up the marks at the hub. If the bike runs a belt instead of a chain, as on a Cowboy and many Urban Arrow and Gazelle city bikes, nothing in this guide applies beyond keeping the belt clean.
Shift so it does not come back
Three habits cover most of it. Ease off the pedal pressure for the half second you are shifting, because shifting under full load is what bends teeth, stretches chains and wears cassettes fastest. Stay out of the extreme cross-chain combinations, since the middle of the cassette is where the drivetrain wants to live. And keep the chain clean and lubed. A dry or gritty chain brings every fault above forward, and in London's winter road spray that means wiping and re-lubing every week or two rather than once a season.
When it is a workshop job
- A bent hanger. Straightening needs an alignment gauge, and by eye it ends up in the spokes.
- A chain that slips under load. Chain and cassette wear should be measured, and the two are usually replaced together.
- Internally routed or seized cables. A new inner and outer is the fix, and it is fiddly without the right tools and spares.
- Hub-gear internals. Anything beyond the cable-mark adjustment is specialist work.
- You have adjusted twice and it drifts back within a week. Something upstream is moving (hanger, cable or wear) and it deserves a proper look. A mechanic comes to you 9am to midnight, seven days a week, across London, and gear diagnosis is exactly the kind of job that is quicker at the kerb than in a workshop queue.
Book a gear repair · About mobile bike repair →
Related guides
Sources and further reading
- BikeRadar: how to adjust bike gears, the UK magazine's workshop guide to indexing, limit screws and checking chain wear with a chain checker.
- BikeRadar: when to replace your bicycle chain, chain-wear thresholds by drivetrain speed and the 12-inch ruler method.